
Used Okuma MCR-A5CII CNC Gantry Milling Machine Specifications
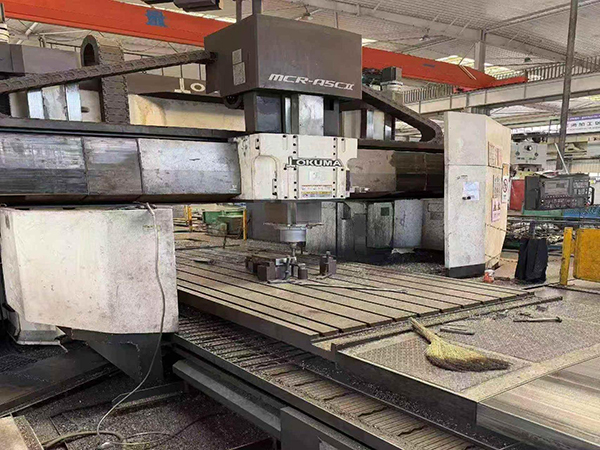
This used Okuma MCR-A5CII CNC gantry milling machine is a Japan-built double-column machining solution with 4200 x 3100 x 800 mm X/Y/Z travel, 1000 mm W-axis travel, a 2000 x 4000 mm table, 10000 rpm spindle speed, a 60-tool magazine, and multiple milling heads for five-face machining. It is suitable for manufacturers machining large plates, mold bases, structural components, aerospace fixtures, automotive tooling, medical equipment plates, and electronics production tooling. Stock No. 812100 is in stock, available now, and ready for immediate shipment, making it a practical option for plants that need large-format machining capacity without waiting for new-machine lead time.
Core Specifications and What They Mean in Production
The Okuma MCR-A5CII is a CNC gantry milling machine and is also commonly evaluated as a double-column machining center for large workpieces. Its value is not only in the travel figures, but in how those figures affect part envelope, tool access, setup strategy, and production flow. For procurement managers and process engineers, the key question is whether the machine can hold the target workpiece, reach the required faces, and support the necessary tooling without excessive re-clamping.
| Machine category | CNC gantry milling machine / double-column machining center |
|---|---|
| Brand and model | Okuma MCR-A5CII |
| Origin | Japan |
| Year | 2014 |
| X/Y/Z axis travel | 4200 x 3100 x 800 mm |
| W-axis travel | 1000 mm |
| Table size | 2000 x 4000 mm |
| Distance from table surface to spindle nose | 1650 mm |
| Maximum spindle speed | 10000 rpm |
| Gantry width | 2650 mm |
| Floor space | 6680 x 10730 mm |
| Machine net weight | 37000 kg |
| Tool magazine capacity | 60 tools |
| Included configuration | Four-axis linear scales, T301 vertical milling head, T302 90-degree vertical milling head, T303BC five-face milling head |
The 4200 mm X-axis travel and 4000 mm table length support long plates, mold bases, machine frames, and fixture plates that are difficult to process efficiently on smaller vertical machining centers. The 3100 mm Y-axis travel and 2650 mm gantry width are important when reviewing wide workpieces, because the part must fit through the column opening while still allowing clearance for clamps, edge machining, and tool approach.
The 800 mm Z-axis travel, 1000 mm W-axis travel, and 1650 mm distance from the table surface to the spindle nose help determine whether tall parts, riser setups, angle plates, and deep cavities can be machined. In real production, this matters for large molds, aerospace fixture blocks, welded structures, and medical or electronics tooling plates where multiple face depths may be required in a single setup.
The 10000 rpm maximum spindle speed gives the machine a broader process window than a low-speed gantry mill used mainly for heavy roughing. It can be considered for mold finishing, aluminum aerospace components, fixture plates, and general large-part milling where both material removal and surface finish are required. Final suitability still depends on cutting tools, material, clamping method, programmed feeds, and the condition verified during inspection.
How the Key Specs Affect Machine Selection
Travel and Table Size
The first selection filter is part size. A 2000 x 4000 mm table does not mean every 2000 x 4000 mm part will be easy to machine; buyers should allow space for clamps, stops, side access, tool overhang, and chip evacuation. The 4200 mm X-axis travel gives useful longitudinal reach across the table length, while the 3100 mm Y-axis travel helps cover wide parts and side positioning. For production managers, this can reduce the need to split large components into multiple setups or outsource oversized machining.
Height, Reach, and W-Axis Stroke
The 1650 mm table-to-spindle-nose distance is important for tall components, tombstone-style fixtures, and riser block setups. Combined with 800 mm Z-axis travel and 1000 mm W-axis travel, it gives the machine reach for deep features and higher workpiece envelopes. This matters in mold making and structural machining, where the part may include ribs, steps, pockets, or cast and welded geometry above the table surface.
Spindle Speed and Tool Magazine
A 10000 rpm spindle is helpful when the production mix includes aluminum, cast iron finishing, mold surfaces, and smaller tools used on a large workpiece. The 60-tool magazine supports complex programs with roughing, semi-finishing, finishing, drilling, tapping preparation, chamfering, and side-face tools in the same cycle. For factories running low-volume, high-mix work, that tool capacity can reduce setup interruptions and keep the machine productive during long programs.
Machine Mass and Floor Requirement
The 37000 kg net weight and 6680 x 10730 mm floor space should be reviewed early in the buying process. This machine is intended for a plant with proper space planning, foundation readiness, rigging access, and loading access. A factory currently relying on smaller machining centers should confirm not only part fit, but also the installation footprint and production flow around the machine.
Frequently Asked Questions
What do the 4200 x 3100 x 800 mm travels mean for part size?
These travels define how far the machine axes can move in X, Y, and Z. In production, they help determine whether the cutter can reach the full work area after the part, clamps, and fixtures are installed. For this MCR-A5CII, the 4200 mm X travel and 3100 mm Y travel support large plates, mold bases, fixtures, and structural components, while the 800 mm Z travel helps with depth and height variation.
Is the 2000 x 4000 mm table suitable for large mold bases?
Yes, the 2000 x 4000 mm table class is well suited for many large mold bases, die bases, and tooling plates. Buyers should still compare the actual workpiece size with clamp space, tool approach, side-machining requirements, and the 2650 mm gantry width before confirming fit.
Why is the 1000 mm W-axis travel important?
The W-axis provides additional vertical movement for the crossrail or spindle system, depending on machine configuration. For buyers, it matters when machining tall parts, deep pockets, large fixtures, or workpieces with multiple height levels. Together with the 1650 mm table-to-spindle-nose distance, it improves the machine’s ability to handle taller setups.
How does the 10000 rpm spindle affect material suitability?
A 10000 rpm maximum spindle speed gives more flexibility for finishing and smaller-diameter tooling than a low-speed-only gantry mill. It can be useful for mold finishing, aluminum components, fixture plates, and precision hole patterns. Material suitability still depends on tool type, cutting parameters, workholding, and verified spindle condition.
What is the benefit of the T301, T302, and T303BC head package?
The T301 vertical milling head supports standard top-face machining. The T302 90-degree head supports side-face and horizontal-feature machining. The T303BC five-face milling head expands access to multiple sides of the workpiece, which can reduce re-clamping for molds, die bases, structural parts, and large fixtures.
Who should consider this used Okuma MCR-A5CII CNC gantry milling machine?
It is best suited to factories and job shops that need large-part machining capacity for automotive tooling, aerospace fixtures, mold making, medical equipment plates, electronics tooling, and general machinery components. It is especially attractive when current equipment lacks table size, axis travel, or multi-face machining access.
More Articles
-
Boring Machine Setup Guide: Key Steps for Accurate On-Site MachiningA reliable boring machine setup begins before the first cut. On-site machining accuracy depends on the condition of the damaged bore, the rigidity of the installation, correct boring bar alignment and measurements taken at each critical stage. Always follow the equipment manufacturer’s manual, approved safety procedures and the specific requirements of the repair project. 1. Inspect the Work Area and Damaged Bore Confirm that the machine, support points, workpiece and surrounding area are suitable for on-site machining. Remove loose debris, oil contamination and obstructions that could affect mounting or measurement. Inspect the existing bore for cracks, distortion, weld buildup, broken fasteners or damage that may change the machining plan. Check access for the boring bar, drive unit, power supply and measuring tools. Identify lifting, guarding and lockout requirements before installation. If the workpiece is unstable or access is restricted, correct those conditions before continuing rather than compensating through cutting adjustments. 2. Measure Before Alignment Record the existing bore condition and the relationship between the bore, surrounding faces and available support locations. Use suitable calibrated measuring equipment and take readings at more than one position where access permits. These measurements establish the starting condition and help determine whether the proposed boring bar travel and final machining allowance are adequate. Do not assume that a visually clean bore is straight or concentric. Taper, ovality, offset and wear can affect alignment decisions. Document the readings so the final result can be compared with the project requirement. 3. Align and Secure the Boring System Boring bar alignment should be established from the required finished bore location, not simply from the edge of the existing hole. Position the support bearings or mounting brackets according to the machine manual and the workpiece geometry. Check the bar position at multiple reference points, then adjust until the axis matches the required machining centerline. After alignment, tighten all mounting hardware in the specified sequence and verify that the supports remain stable. Secure the workpiece and machine against movement, vibration and accidental contact. Recheck alignment after tightening because clamping force or uneven support can shift the boring bar. 4. Set Cutting Parameters and Bore Set tool projection, feed, rotational speed and depth of cut according to the machine manual, tool condition, material, bore size and required finish. Use conservative starting conditions when the material condition or rigidity is uncertain. Confirm tool clearance, rotation direction, chip evacuation and guarding before starting the drive. During the cut, monitor vibration, unusual noise, tool wear and mounting movement. Stop the operation if the setup changes or if cutting conditions become unstable. A controlled setup is more important than forcing a higher removal rate. 5. Verify the Finished Bore After machining, clean the bore and measure the finished diameter at the locations required by the project specification. Check for taper, ovality, surface damage and the required relationship to adjacent features. Record the final results and compare them with the acceptance criteria before removing the equipment. Frequently Asked Questions How long does an on-site boring machine setup take? There is no universal installation time. The duration depends on access, bore size, mounting complexity, alignment requirements, site conditions and the inspection process. Confirm the expected schedule from the equipment manual and project plan rather than using a fixed estimate. How is the boring bar aligned? Measure the required bore axis, position the supports and adjust the bar at multiple reference points. Recheck alignment after all supports and clamps are tightened. Which setup errors affect accuracy most? Unstable supports, incorrect centerline measurement, bar deflection, workpiece movement and failure to recheck alignment can directly affect bore size, straightness and concentricity. What must be checked before machining starts? Verify mounting security, bar clearance, tool condition, power and controls, guarding, workpiece stability, measurement records and the approved cutting parameters.

-
Boring Machine Accuracy: Key Factors That Affect Machining ResultsA bore can meet its diameter requirement yet still fail assembly because its axis is misplaced, its shape is distorted or adjacent bores are misaligned. Boring machine accuracy therefore needs to be assessed against the drawing’s dimensional, geometric and surface finish requirements. For portable line boring repairs on excavator pivots, loader frames and similar assemblies, the machine, mounting arrangement and workpiece form one machining system. Published machine capability alone cannot establish the finished result. Accuracy Factors Checklist Factor Effect on results Control before finishing Machine and bar rigidity Deflection and vibration can produce taper, chatter or size variation. Minimize unsupported bar length and tool overhang; check supports and bearing condition. Alignment and mounting An incorrect bar axis produces bores in the wrong position. Reference approved datums and recheck alignment after securing mounts. Tool condition and cutting parameters Wear, built-up edge and excessive cutting forces alter size and finish. Check insert condition, tool clamping, speed, feed and depth of cut. Workpiece condition Clamping distortion, weld stress and heat can change geometry. Inspect cracks, weld repairs, support points and temperature. Measurement method Limited sampling or unsuitable gauges can miss defects. Use calibrated instruments with resolution and uncertainty appropriate to the tolerance. Control the Setup Before Adjusting the Cut Establish the required bore axis from the drawing or an approved repair reference. Worn bores may no longer represent the original centerline. For line boring accuracy, verify the relationship between all relevant bores, rather than centering independently on each damaged opening. Secure the component and supports, then check that the bar rotates freely and the alignment remains stable. Stop the drive before adjusting tools or supports. A light trial cut can reveal chatter or uneven engagement, but it does not prove positional accuracy. Select cutting parameters for the material, insert and setup rigidity. Excessive cutting force can deflect the bar; an excessively light cut can cause rubbing. Leave controlled finishing stock, monitor tool wear and investigate dimensional drift before continuing. Verify Size, Form and Axis Separately Clean and deburr the bore before inspection. Measure diameter at multiple depths and angular positions to screen for taper and ovality. These readings alone do not establish roundness, cylindricity or coaxiality; use an inspection method suited to each drawing requirement. Account for workpiece and instrument temperature. Where clamping may distort the component, agree whether acceptance measurements apply in the clamped or released condition. Record the setup, measurement locations and results. Accuracy and Alignment FAQ Does correct alignment guarantee an accurate bore? No. Alignment establishes the intended axis, while rigidity, tooling, cutting conditions and workpiece stability determine whether machining maintains it. What information is needed to assess achievable accuracy? Provide bore dimensions, spacing, material, required tolerances, datum references, repair history, access restrictions and the proposed inspection method. Any accuracy commitment should be confirmed for those conditions.

-
How to Choose a Boring Machine for Excavator and Loader RepairsChoosing a boring machine for excavator repair starts with the damaged part. Pin bores, bucket linkages and boom connections place different demands on alignment, access and machine setup. For loader work, the same principle applies to articulation points and pivot bores. Identify the repair location first, then match the machine to the bore diameter, available working space and required installation method. Match the machine to the damaged component Equipment Part Typical Repair Requirement Excavator pin bores Restore worn or oval bores while keeping the bore aligned through the connected lug structure. Bucket linkage Repair multiple linkage bores with controlled positioning around compact, obstructed assemblies. Boom and arm connections Handle larger pivot bores and maintain alignment between separated mounting ears. Loader articulation points Recondition central hinge and pin bores where access, clearance and machine positioning affect setup. Loader pivot bores Remove wear and prepare the bore for a replacement or repaired pin with consistent geometry. Start with the bore problem Excavator pin bores commonly develop ovality, uneven wear and clearance around the pin. A suitable boring machine for excavator repair should allow the operator to establish a stable reference, align the cutting bar with the original bore centerline and remove only the material needed for the repair. If several connected bores are involved, the machine must support a setup that preserves their relationship. For bucket linkage and boom or arm connections, access can determine machine fit. Check whether the boring bar can pass through the assembly, whether the mounting points provide enough room for supports, and whether nearby hydraulic lines or structural members restrict positioning. A compact setup may be essential for on-site repair, while a larger and more rigid arrangement may suit a major pivot bore. Requirements for a boring machine for loader repair Loader articulation points and pivot bores require careful attention to alignment because the repaired bore affects hinge movement and pin loading. Before selecting equipment, record the bore diameter, bore length, distance between bores, access direction and available clearance around the loader frame. These details help determine the cutting-bar arrangement, support placement and whether the repair can be completed without removing the full assembly. Site conditions also influence the choice. Confirm the power supply, lifting and handling options, working height, weather exposure and space for measurement and machining. Buyers should verify the machine’s usable diameter range, boring-bar length, mounting method, alignment procedure and suitability for the specific excavator or loader component. Information to send before requesting a recommendation Equipment type and the exact repair location Measured bore diameter, length and wear condition Pin dimensions and whether bushes will be installed Photos showing access, obstructions and surrounding structure On-site or workshop repair conditions, including available power This information allows a supplier to assess machine fit against the actual repair rather than the equipment model alone. FAQ: excavator and loader bore repairs Can one machine repair excavator pin bores and loader articulation points? It may, if its diameter range, bar length, support arrangement and mounting options suit both components. Verify each repair dimension and access condition before selecting a general-purpose setup. What should be measured on a worn excavator bore? Measure the existing bore diameter at several positions, identify ovality and taper, record bore length, and check the mating pin and surrounding lug alignment. These measurements define the machining allowance and setup requirements. What information is needed for a boring machine for loader repair? Provide the loader model, articulation or pivot location, bore and pin dimensions, photos of the working area, access direction, clearance and site power conditions.

-
Boring Machine for Mining Equipment: What Buyers Should ConsiderMining equipment repair rarely takes place in a clean workshop. A boring machine for mining equipment must work around abrasive dust, moisture, limited access, heavy components and urgent production schedules. For procurement teams, the right choice depends on the actual repair environment and the equipment being serviced, not only on the machine's advertised capacity. Start with the Mining Repair Environment First assess where mining equipment boring repair will occur. An underground site may require a compact, portable machine that can be positioned around a loader, excavator or haul truck without removing the complete structure. An open-pit maintenance area may allow more room, but still exposes equipment to dust, vibration, mud and temperature changes. Ask suppliers how the machine is protected during transport and operation. Check the accessibility of controls, the method used to secure the machine to the workpiece, and how easily chips and contamination can be cleared from critical moving parts. A field repair system should also support practical setup, alignment and inspection procedures when workshop equipment is unavailable. Match the Machine to Equipment Constraints Mining repair requirement What to verify Why it matters Large pins and pivot bores Applicable bore diameter range, bar length and tooling options Prevents the machine from being undersized for major joints Restricted access Portable configuration, mounting method and clearance requirements Determines whether repair can be completed in position Hard or damaged material Drive power, feed control and compatible cutting tools Supports stable cutting under demanding repair conditions Multiple equipment types Adjustability, modular components and available accessories Improves utilization across different machines and bore sizes Do not evaluate bore diameter alone. Confirm the complete working envelope: minimum and maximum bore size, usable boring-bar length, mounting span, alignment method and access around the damaged joint. The machine must also suit the metallurgy and damage condition commonly found in the fleet. Evaluate Power, Durability and Maintenance Power should be considered together with control. A suitable drive system needs enough torque for the planned cutting tools and materials while maintaining controlled rotation and feed. Ask for application guidance based on the actual equipment, bore dimensions and repair material rather than relying on a general power figure. For mine-site use, inspect wear-prone parts, seals, bearings, cables, gear components and mounting hardware. Request a clear maintenance schedule and identify which parts can be inspected or replaced by site technicians. Spare-part availability is a procurement issue, not an after-sales detail: delays involving a drive component, cutter or fastening element can extend equipment downtime. Check Engineering Support Before Purchase Supplier support should cover configuration, setup, alignment, tooling selection and troubleshooting. Before issuing a purchase order, request a documented list of included components, optional accessories, recommended consumables and spare parts. Verify training or commissioning arrangements where the repair team has limited experience with portable line boring. Also confirm how the supplier handles unusual bore sizes, difficult access and repairs requiring additional fixturing. A durable machine is valuable only when the site team can install, operate, maintain and restore it with dependable technical support. FAQ: Mining-Site Durability and Maintenance Can a portable boring machine be used in underground mining repairs? It can be suitable when its dimensions, mounting method, power source and access requirements match the underground work area. Confirm transport limitations and the available space around the damaged bore before selection. What maintenance information should buyers request? Request inspection intervals, lubrication requirements, wear-part identification, troubleshooting procedures and a recommended spare-parts list. The documentation should explain which maintenance tasks can be completed at the mine site. Why is engineering support important for mining equipment boring repair? Mining repairs often involve irregular access, large structures and varying bore conditions. Technical support helps determine the correct machine configuration, tooling and alignment method before equipment downtime becomes longer.